
- 0
- 1,556 word
Seeing an ant trail, hearing scratching inside a wall, or finding insect wings near a window can leave you wondering how serious the problem is. A professional pest inspection replaces guesswork with evidence. The inspector looks for active pests, past activity, entry points, damage, and conditions that attract pests.
A proper inspection is more than a quick walk through the house. It covers obvious trouble spots and less-visible areas such as attics, crawl spaces, utility openings, and the foundation. By the end, you should understand what was found, what may be causing it, and which next steps make sense.
What a Pest Inspection Is Designed to Find
The first goal is to identify pest activity. Many insects and rodents stay hidden or live inside walls, cabinets, insulation, soil, and storage areas. Inspectors look for droppings, shed skins, nesting material, gnaw marks, mud tubes, damaged wood, grease marks, dead insects, and live pests.
The next goal is to find conditions supporting the problem. Moisture, food access, plumbing leaks, structural gaps, damaged screens, clutter, and vegetation touching the home can all play a role. Treating visible pests without correcting the source often leads to the same problem returning.
For a homeowner researching pest control escondido, an inspection can help determine whether a few visible pests point to an isolated issue or activity spread through several areas. That distinction helps match the response to the actual problem instead of treating the property blindly.
What Happens at the Start of the Inspection
Most inspections begin with a short conversation. The inspector may ask what you saw, where you noticed it, how long it has been happening, and whether activity changes by time of day or season. Those details can narrow the search quickly.
Be specific. Scratching at night near one bedroom wall is more useful than saying you heard an animal somewhere in the house. Photos, trapped insects, damaged food packaging, or notes about recurring sightings can give the inspector more evidence to work with.
The Exterior Inspection
Many infestations begin outside. The inspector will often examine the foundation, siding, roofline, vents, doors, windows, garage edges, and places where pipes or cables enter the structure. Tiny gaps can still give ants, cockroaches, spiders, and rodents a route indoors.
Moisture gets close attention too. Leaking irrigation, poor drainage, overflowing gutters, damp soil, and shrubs pressed against siding can make an area more attractive to pests. The inspector is looking for conditions that connect to the problem, not simply every cosmetic crack around the property.
The Interior Inspection
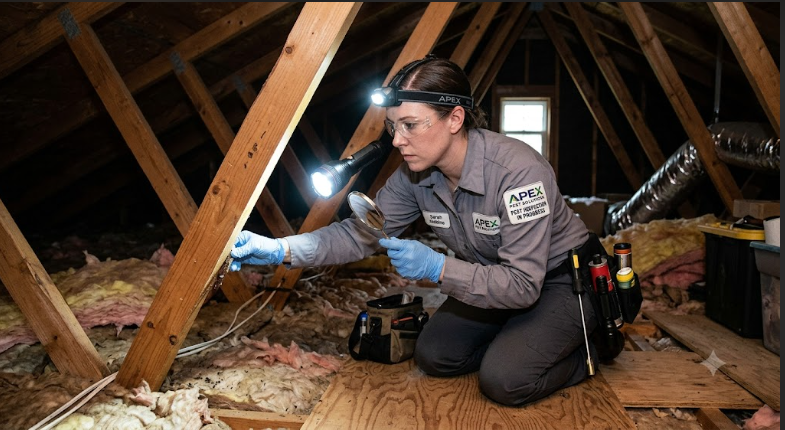
Inside, inspectors focus on places that provide food, water, warmth, and shelter. Kitchens, bathrooms, laundry rooms, garages, utility spaces, attics, and storage areas tend to receive the most attention. The inspector may check below sinks, behind accessible appliances, around plumbing lines, inside cabinets, and along baseboards.
Different pests leave different clues. Rodents may leave droppings, rub marks, gnawed materials, or nesting debris. Cockroaches can leave fecal spotting, egg cases, and shed skins. Ant trails may reveal a travel route, and bed bugs can leave dark spotting, cast skins, eggs, or live insects close to sleeping areas.
Inspectors often use flashlights, mirrors, moisture meters, probes, or similar tools. Attics and crawl spaces can reveal droppings, damaged insulation, moisture, nesting material, or entry routes that are invisible from the main living area.
How Inspectors Check for Termites
Termites need focused attention since much of their activity can stay concealed inside wood or soil. An inspector may look for mud tubes, discarded wings, hollow or damaged wood, frass, moisture problems, and places where wood touches soil. Foundations, crawl spaces, garages, decks, and attached wooden structures can provide useful evidence.
Someone researching termite control escondido may hear an inspector describe active infestation, previous activity, or conducive conditions. Those findings do not mean the same thing. Live termites call for a different response from old damage with no current activity, and excess moisture can raise future risk where no termites are visible.
A pest professional may gently probe suspicious wood or use moisture-reading equipment. No non-destructive inspection can expose every concealed space, so a clear report should separate confirmed findings from areas that could not be inspected.
What an Inspector May Not Be Able to See
A standard pest inspection is thorough, but it does not involve tearing apart the home. Inspectors do not normally open finished walls, remove flooring, dismantle cabinets, or cut into ceilings just to search for pests. Some concealed activity can remain out of view.
Stored boxes, heavy furniture, locked rooms, sealed crawl spaces, unsafe attic conditions, and finished surfaces can limit access. A careful inspector should explain these limits. If evidence points to a hidden problem, the next step may involve monitoring, a follow-up visit, treatment, or access created by an appropriate trade.
What Happens After the Inspection
Once the inspection is finished, the inspector should explain the findings in clear language. You should know what pest was identified, where activity was found, how widespread it appears to be, and what conditions may be contributing to it. Photos can make those findings easier to understand.
A written report may separate active evidence from risk factors such as damaged screens, gaps around utility lines, moisture, rodent entry points, or sanitation issues. Treatment is not always the only answer. Some problems need exclusion work, leak repairs, trimming, trapping, baiting, sanitation changes, or monitoring.
Questions to Ask After the Inspection
Do not focus only on price. The inspection is your chance to understand the diagnosis and why a certain response is being recommended. Ask direct questions until the plan makes sense.
Useful questions include:
- What pest did you find, and how confident are you in the identification?
- Where is the main activity located?
- What is helping the pest enter or survive on the property?
- What treatment, repair, or prevention step do you recommend?
- What should I expect afterward, and when should the area be checked again?
Ask about inaccessible areas too. If damage was found, ask whether it appears old, active, cosmetic, or potentially structural. That helps separate urgent work from routine prevention.
Common Mistakes Homeowners Make
One mistake is removing every clue before the appointment. Cleaning droppings, spraying visible insects, throwing away damaged packaging, or moving nesting material can erase useful evidence. Take photos first and leave key signs undisturbed where practical.
Another mistake is assuming one sighting tells the whole story. A mouse in the garage does not reveal its entry point. Ants on a counter do not identify the nest. Termite wings near a window do not show how far activity extends.
Homeowners can waste money by approving treatment without understanding the cause. A spray will not close a roof gap used by rodents. Repeated ant treatments can fail where leaking plumbing keeps providing water. The inspection should connect the pest, the conditions supporting it, and the proposed fix.
How Long Does a Professional Pest Inspection Take?
Inspection time varies with property size, access, pest type, and the amount of activity. A small home with one ant problem may take far less time than a large property with attic rodent signs and suspected termite damage.
Speed alone does not measure quality. A focused inspection should spend enough time on the areas most likely to explain the problem. Tell the company about detached structures, crawl spaces, heavy storage, or several problem areas ahead of the appointment.
How to Prepare for a Pest Inspection
A little preparation can make the visit more useful. The goal is to improve access without wiping away evidence.
Before the appointment:
- Write down where and at what times you notice activity.
- Move stored items away from key walls, sinks, and access panels.
- Keep pets away from inspection areas.
- Save useful photos or insect samples.
- Point out leaks, repairs, prior treatments, and known entry points.
For recurring problems, tell the inspector what has already been tried. Past treatment history can help the inspector look beyond visible pests and search for the source.
What to Do With the Inspection Results
A professional pest inspection should leave you with a plan, not just the name of a pest. Separate active problems from prevention items first. Rodents entering a living area need faster attention than a small exterior gap with no sign of current use.
Next, correct conditions tied to the findings. Repair leaks, seal relevant openings, improve drainage, trim vegetation, protect stored food, and reduce clutter where needed. Keep the report and photos so future visits can be compared with the original findings.
If treatment is recommended, ask what you should expect afterward. Some activity can continue briefly after treatment, and certain methods require follow-up visits or monitoring. Knowing the expected timeline makes it easier to judge whether the plan is working.
A Pest Inspection Gives You a Clear Starting Point
Pest problems become easier to solve once you know where they are coming from. A professional inspection connects visible clues with hidden causes and identifies which areas need attention first. That can reduce wasted treatment, repeat infestations, and damage that grows unnoticed.
If you have found droppings, damaged wood, recurring insects, unexplained noises, or other signs of pest activity, arrange an inspection before the problem spreads. Keep notes, provide access to problem areas, and ask for a clear explanation of every major finding. The next step should be based on evidence, not guesswork.
Author

Freshmediarecord01@gmail.com
Related Posts

Why Every Marketer Is Secretly Relying on Social Growth Platforms
- 0
- 1,178 word
Building a strong social media presence has become more challenging than ever. Every day, millions of posts compete for attention across Instagram,...
Read out all
How AI and New Supply Chains Are Quietly Changing Our Kitchens
- 0
- 1,209 word
How AI and New Supply Chains Are Quietly Changing Our Kitchens Introduction The modern kitchen is evolving faster than most people realize....
Read out all
Which Hotel Price Tracker Is Actually Worth Using for Business Travel?
- 0
- 1,160 word
Business travel comes with tight schedules, fixed budgets, and constant pressure to keep costs under control. While airlines often receive the most...
Read out all
Preseason Position Battles That Will Decide Fantasy Football Drafts
- 0
- 1,136 word
Fantasy football championships aren’t won on draft day—they’re won by identifying value before everyone else does. Every NFL preseason brings exciting position...
Read out all
Where Is the Global Economy Headed? Major Predictions and Market Shifts
- 0
- 1,190 word
The global economy has entered a period of rapid transformation. Inflation, rising interest rates, technological innovation, geopolitical tensions, and changing consumer behavior...
Read out all
How AI and Robotics Are Changing Metal Fabrication in 2026
- 0
- 1,068 word
The metal fabrication industry has always been driven by innovation. From manual welding to CNC machines, every technological advancement has helped manufacturers...
Read out all